Homeworlds Grand Moff Tarkin Spotlight Deck Guide: Fortify and Deploy the Death Star
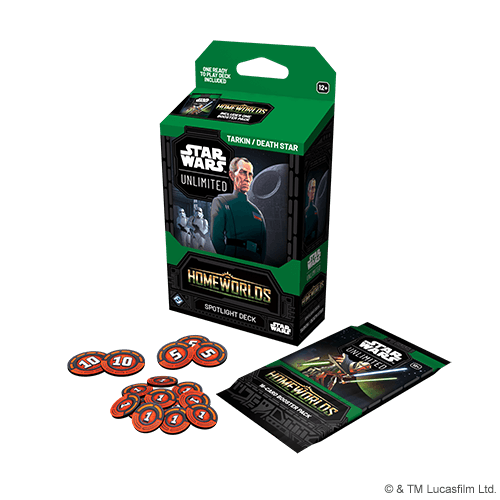
Tarkin asks you to do something more interesting than wait for nine resources: spend the intervening rounds buying enough time without spending every card on delay. The Homeworlds Spotlight Deck combines base fortifications, small defensive units, healing, and a leader deployment that changes the shape of the game. The payoff is the Death Star, but the decisions that make it possible begin in your opening six.
I would choose this deck for someone who enjoys making an opponent work for each meaningful attack. I would not choose it merely because a giant space station sounds unstoppable. A hand full of late plays can lose before the impressive part matters, and an opponent with a fast space clock will punish defenses placed in the wrong arena.


Jump to a section
- The exact leader: Architect of the Tarkin Doctrine
- What the deck's defenses are trying to accomplish
- A keepable hand needs an early action, not only a late plan
- A three-step defensive decision
- Reaching nine resources without wasting the deployment
- The ten-HP finish: two worked positions
- How the supporting units change the plan
- Where this deck can struggle
- Upgrade experiments with a purpose
- B3's verdict
- Official fixed 50-card main deck
- Buying the deck and choosing upgrades
- Learn the rules, then test the fixed deck
The exact leader: Architect of the Tarkin Doctrine
This is Grand Moff Tarkin, Homeworlds #004, a Vigilance/Villainy leader. His non-unit side ignores aspect penalties on upgrades with Fortify that you play. It does not make those upgrades free, reduce their printed costs, or waive aspect penalties on unrelated units and events. Keep that distinction in mind when a colorful hand makes several plays look equally affordable.
His Epic Action requires nine resources you control. Deployment transforms him into The Death Star: a space leader unit with 2 power and 12 HP. It retains the Fortify aspect-penalty exception. At the start of regroup, its ability can defeat a base with 10 or less remaining HP. That timing is the deck's finishing puzzle: merely deploying while the opposing base is at ten does not resolve the effect immediately.
Your supplied base is Senate Rotunda. Tarkin himself supplies Vigilance and Villainy; the base supplies Command. Fortify lets an upgrade attach to your own base instead of a unit. The base's printed HP and the effects actually attached to it still govern survival. “Fortified” is a relevant condition for several cards, not a blanket damage shield supplied by the keyword.
What the deck's defenses are trying to accomplish
I divide the defensive package into prevention, recovery, and interference. Alliance Shield Generator helps against a substantial hit; Sinister War Memorial helps recover base damage; Carbonite Chamber and The Tarkin Doctrine interfere with the opponent's units. Those jobs overlap, but they solve different board states. Healing after a small attack is not equivalent to preventing a lethal one.
Imagine the opponent can threaten six damage with one attacker or spread six damage across several attacks. A single-hit protection effect can have very different value in those positions. Read its exact trigger, eligibility, and consumption before deciding you are safe. Do not mentally subtract the same defensive effect from every attack in the phase.
Director Krennic rewards maintaining a fortified base, while Vice Admiral Rampart helps protect a Fortify upgrade. Remote Scout helps find the type of card that turns that network on. That makes an early, affordable fortification valuable for more than its isolated text. It may support future card access or protect an investment already producing value.
A keepable hand needs an early action, not only a late plan
Before keeping an opening hand, identify two resources, an affordable play, and a follow-up. I would prefer a modest defensive curve with a useful Fortify piece over several expensive cards that all become exciting on the same distant round. A defensive deck still needs to use its first resources effectively.
Do not automatically resource every unit because the base upgrades look like the theme. A unit can remove an attacker, threaten a trade, or make an opponent spend an action dealing with it. If your defenses only delay damage without changing the enemy board, the next round may present the same attacks plus another threat.
Conversely, preserving every situational answer can strand the hand. Ask which problem is actually visible. If the opponent is already building space pressure, a useful ship or relevant answer may deserve priority over a second ground-only defensive piece. Nine resources is a destination; making the intervening resource choices survivable is the route.
A three-step defensive decision
First count the damage that can arrive before your next useful action. Include ready attackers in both arenas and the opponent's leader deployment. Second determine which one action changes that total most effectively. Third consider what your chosen play leaves available afterward.
For example, if a surviving enemy unit can attack for four this round and four next round, removing it may prevent more than a small heal. But if the base will be defeated before that removal becomes available, immediate protection is more valuable. This is why “always heal first” and “always remove units first” are both poor substitutes for reading the clock.
Suppose you can spend your remaining resources on another fortification or deploy a unit that can later contest space. The extra fortification may improve the base engine, but an unopposed ship can create several rounds of damage. I would ask what each option prevents over the next two rounds, rather than which option best advertises the deck's mechanic.
Reaching nine resources without wasting the deployment
Exhausted resources still count toward the threshold. At nine total resources, spending them on a defensive play does not itself stop Tarkin deploying on a later action. The opponent gets an action between the play and deployment, however. Your resource count is not permission to announce an uninterrupted sequence.
Before deploying, ask whether the Death Star has a realistic route to surviving until the next regroup begins. It enters as a space leader unit, so enemy space units and relevant effects matter. Twelve HP is substantial, but it is not immunity. Avoid treating an undefended ground fight as the only battlefield once your leader moves to space.
Do not confuse its 2 power with its finishing condition. An ordinary attack can help lower the opposing base, but the start-of-regroup ability is the special payoff. You may need normal attacks from other units to push the base into range before ending the action phase.
The ten-HP finish: two worked positions
Position one: the enemy base has 12 remaining HP, your Death Star is ready, and there is no relevant Sentinel or prevention. A normal two-damage attack at the base would bring it to ten. If the station remains in play until regroup starts, its ability can finish the base. The opponent gets actions before your attack, after it, and before the phase ends as appropriate; this is a line to protect, not an automatic combo announcement.
Position two: the base is already at ten, but an enemy ship can defeat the damaged Death Star on its next action. Claiming initiative does not immediately start regroup or deny that ship its remaining action. You may need to remove, exhaust, or otherwise address the threat before committing to the end of the phase. Initiative is not a protective bubble around the win condition.
Against healing, leave room for the threshold to move. A base on ten that heals above ten before regroup no longer meets the same condition. Count the opponent's available effects, and prefer a robust finish over one that only works if they decline every remaining useful action.
How the supporting units change the plan
Clone X Assassin's Weakness contribution can make later combat easier. Weakness reduces both power and HP, so calculate the new remaining HP rather than treating the token as a simple damage counter. A unit weakened into defeat is a different outcome from one merely dealing less damage next attack.
Rho Medical Shuttle and Carrion Spike give the recovery plan a space presence. Their bodies matter as well as their helpful text. A ship that heals and then demands an answer can change the damage race more substantially than healing that leaves the opposing space lane untouched.
The fixed list also includes earlier-set cards such as Doctor Pershing, Moff Gideon, and Long Live the Empire. Check the exact printing before copying an interaction from another deck. Shared character names do not guarantee shared abilities, and a Homeworlds package can contain cards originally printed elsewhere.
Where this deck can struggle
Wide pressure can overload a defense designed for one large hit. Upgrade removal can dismantle an engine you spent several actions establishing. A slow hand can make every later defensive exchange feel one resource short. Those are reasons to preserve a functioning curve, not proof that the deck needs an immediate expensive rebuild.
There is also the opposite failure: stabilizing successfully but never lowering the enemy base into finishing range. Defensive wins still need a plan to end the game. Once the immediate damage clock is under control, identify which units can safely pressure the base and which need to remain available for trades.
Against Chewbacca, remember that an exhausted friendly unit is not necessarily finished attacking. Protect important defenders accordingly. Against a deck that mostly ignores your units and races the base, reassess how many of your plays actually reduce incoming damage rather than simply increasing the number of fortifications.
Upgrade experiments with a purpose
The printed deck already has three copies of The Tarkin Doctrine, Rampart, Sinister War Memorial, and Krennic. Adding a fourth is not an ordinary constructed upgrade. If the engine feels inconsistent, distinguish failing to draw a piece from failing to afford or protect the pieces you did draw.
If space pressure is the recurring problem, test another copy of a supplied useful ship by replacing a situational card that has repeatedly done little. Rho Medical Shuttle begins at two copies, so a third is one possible experiment after checking the exact card's legality and cost. Record whether it actually changes the games you were losing.
If your base rarely becomes fortified early enough, examine the cost distribution and the role of Remote Scout before buying a spectacular late threat. A third Scout is a small consistency experiment; it is not a claim of an optimized tournament list. Change a few cards, keep the main deck coherent, and compare several games with the unchanged version.
B3's verdict
Tarkin is appealing because his defense has a visible destination and his destination has a precise timing condition. The deck teaches you to value actions that buy a whole additional round. I would recommend it to someone who enjoys patient sequencing and can tolerate games where survival takes priority over showing off the leader. Learn to count the next two rounds of damage, then learn when you can stop defending and start arranging the finish.
Official fixed 50-card main deck
The leader and Senate Rotunda base sit outside these 50 main-deck cards. Counts below follow the official product list; earlier printings and same-name cards can have different abilities. Use the linked original for printed card numbers and previous-set markers.
- 1 each: Bacta Tank; Carrion Spike; Display Piece; Craving Power; No Glory Only Results; Intelligence Agency.
- 2 each: Carbonite Chamber; Clone X Assassin; Doctor Pershing; Imperial Dark Trooper; Onyx Squadron Brute; Remote Scout; Long Live the Empire; Alliance Shield Generator; Death Trooper; Moff Gideon; Rho Medical Shuttle; AT-ST Raider; Imperial Armored Commando; Morgan Elsbeth; Stockpile; Trask Walker.
- 3 each: The Tarkin Doctrine; Vice Admiral Rampart; Sinister War Memorial; Director Krennic.
Inspect the official complete decklist image. The list includes both paired products; use the section headed Grand Moff Tarkin.

Buying the deck and choosing upgrades
This is one player’s preconstructed deck, not a two-deck starter. An opponent needs their own playable deck. Check language, sealed condition, included accessories, and whether the listing is a single deck rather than a display or an individual leader card. Compare delivered prices; no live price or stock promise is made here.
As an Amazon Associate, B3 earns from qualifying purchases.
Search Amazon for the Homeworlds Grand Moff Tarkin Spotlight Deck.
This is a search link because an exact individual listing was not verified. Check the result’s full product name before buying.
Homeworlds had region-specific product delays. Check the seller’s actual availability and the official release update before paying a scarcity premium.
Learn the rules, then test the fixed deck
For a quick visual introduction, B3’s How to Play guide includes an 8:45 beginner tutorial. It explains the core action rhythm; use the worked examples here for this exact leader and fixed deck.
Keep the stock deck together for the first games. Record one resource choice, one action-order decision, and one card that felt stranded. Change a few slots only after identifying a repeated problem. For the next purchase, compare complete decks, singles, and boosters in the buying guide.
Event play: check the current format, reprint eligibility, errata, and suspended list before bringing the stock deck to an event. These products mix printings from different sets; an old printing may remain legal through an eligible reprint, but a recent package is not itself a legality certificate. Proposed upgrades here are small experiments, not a verified competitive list.
Card and inventory checks: October 20, 2026. Sources: official Spotlight Deck overview, official first look and leader images, current rules, errata, and suspended cards, and the original decklist linked above. Future rule or format changes take precedence.
Return to B3’s Star Wars: Unlimited hub.
Scope: the official Homeworlds fixed Spotlight Deck, led by Grand Moff Tarkin — Architect of the Tarkin Doctrine. This is rules-based analysis of the printed deck, with proposed practice and upgrade ideas; it does not claim B3 tournament results or hands-on testing.
Compare the paired deck: Homeworlds Chewbacca Spotlight Deck: How to Play the Relentless Rebel. Browse all twelve Spotlight Deck guides and the SWU learning guides.
Considering packs for upgrades? Read the Homeworlds booster buying guide before choosing a sealed product. For premium treatments, see Carbonite packs explained.