Ashes of the Empire Luke Skywalker Spotlight Deck Guide: Heal, Survive, Attack Again

The Ashes of the Empire Luke Skywalker deck makes surviving a fight part of the reward for taking it. Its healing can turn a unit that would normally be used once into a piece you can send into another useful exchange. The catch is decisive: healing after an attack cannot save a unit already defeated during that attack.
I like this as a learning exercise in combat arithmetic. The deck asks you to compare enemy power, remaining HP, and what your post-attack healing will actually change. It is not a license to attack anything with a damaged unit, and it is not the original Spark of Rebellion Luke shield deck under a different box design.
Jump to a section
- Which Luke are we using?
- Think in survival breakpoints
- Your opening hand should build a board worth healing
- Self-damage is a cost you can manage, not ignore
- Support: develop and attack within one action
- The deployed Luke turn
- Advantage, upgrades, and turning survival into pressure
- Ground and space require separate plans
- Mistakes that quietly waste the leader
- Useful upgrade experiments
- B3's verdict
- Official fixed 50-card main deck
- Buying the deck and choosing upgrades
- Learn the rules, then test the fixed deck
Which Luke are we using?
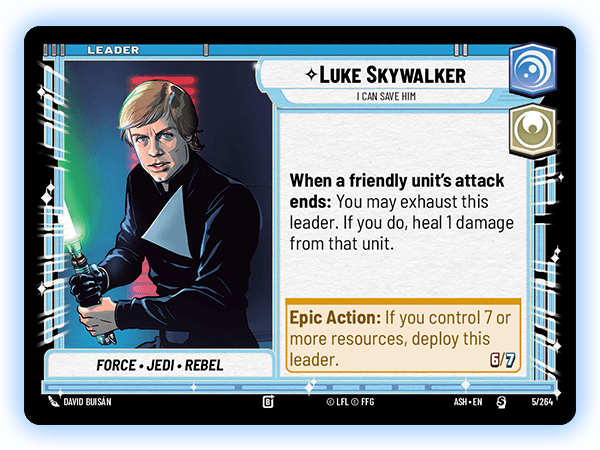
This guide covers Luke Skywalker — I Can Save Him, Ashes of the Empire #005, a Vigilance/Heroism leader. The supplied base is Dragonsnake Bog. His non-unit ability can exhaust Luke when a friendly unit's attack ends to heal one damage from that unit. Because exhausting the leader is part of the choice, you do not ordinarily repeat that heal on every attack while Luke stays exhausted.
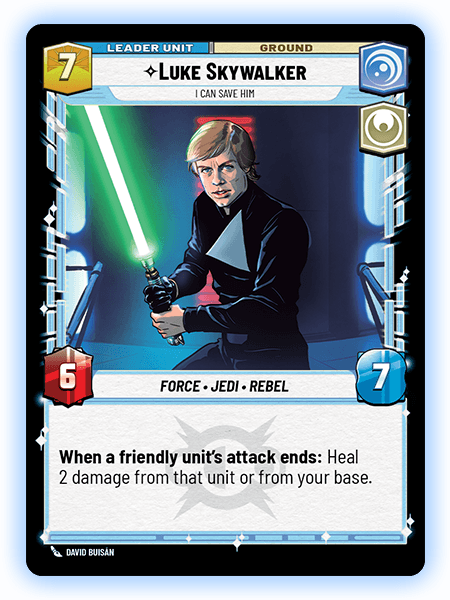
He deploys at seven resources as a 5-power, 7-HP ground leader unit. His deployed ability heals two damage from the friendly attacker or from your base when a friendly unit's attack ends. That is a change in both scale and flexibility: the base can become a healing destination, and the ability no longer uses the non-unit leader's exhaust payment.
Seven resources controlled is a threshold, not a seven-resource payment. You can spend resources on a play and still deploy later in the phase if you continue to control enough. You still take those actions separately, giving the opponent opportunities between them.
Think in survival breakpoints
Take an invented unit with 4 power, 5 HP, and one existing damage. It attacks an unshielded 3-power, 4-HP defender with no other abilities. The defender is defeated; your attacker takes three more damage, reaching four. If eligible healing resolves afterward, that unit has a better chance of surviving its next encounter. Without healing, it would remain one damage away from defeat.
Now give your attacker two existing damage instead. The same combat brings it to five and defeats it. You do not get to remove a counter afterward to undo that defeat. This is the deck's most important habit: check whether the unit survives before counting the heal.
Attacking the enemy base can also be a route to recovery because the base does not normally deal combat damage back. If an important attacker is wounded and no Sentinel interferes, a base attack may advance the win and make the attacker healthier. That does not automatically make it better than removing a dangerous enemy; compare the damage you prevent by trading with the damage you gain by racing.
Your opening hand should build a board worth healing
Look for an affordable unit and a follow-up, not a collection of healing payoffs with no way to establish presence. Decide which two opening cards become resources before declaring the hand a keep. If all your exciting cards require a board you cannot develop, the hand is less functional than it looks.
The fixed list's Battered Haulcraft, Ewok Warrior, and Red Squadron X-Wing give you different ways to establish bodies. A first-game priority is discovering which arena your opponent is likely to contest. Do not resource the only useful space option because the ground interactions read more dramatically.
Preserve a believable route toward seven resources. Early in the game, skipping growth can delay both your normal curve and the stronger leader side. Later, when you have enough resources for the plays you are actually drawing, keeping a useful card can be better than automatically feeding every regroup draw into the resource row.
Self-damage is a cost you can manage, not ignore
Han Solo and Battered Haulcraft are examples of cards whose self-damage becomes more attractive when the deck can repair the consequence. That does not remove the opponent's chance to act while a unit is wounded. A card that arrives damaged can still be removed before it earns its first healing opportunity.
Leia Organa's On Attack interaction is especially instructive. Her self-damage can help heal your base before combat resolves, while Luke's healing comes after the attack. Check whether Leia or the unit borrowing her abilities survives the intervening combat. The order is the point: a benefit before damage and a repair after damage are not one simultaneous calculation.
I would first practice this into a base attack where the combat arithmetic is simple, then into a unit where the trade is profitable. Learn the sequence with all counters visible before relying on it to rescue a complicated battlefield.
Support: develop and attack within one action
Support lets a newly entering unit enable an attack with another unit and pass along its other abilities for that attack. It does not simply announce that the entering unit attacks itself, and it does not say an exhausted attacker ignores the ordinary readiness requirement. Select a legal attacker and resolve the full interaction.
That makes Leia and Doctor Pershing more than bodies placed after your attacks are finished. You may want to hold a suitable ready attacker while you play the Support unit. Playing your combat first can waste the opportunity to combine development with the borrowed effect.
Consider a ready unit that can survive a favorable trade. You could attack now, then later play Leia. Alternatively, play Leia first and use Support so the same attack carries her relevant abilities. The opponent does not get an unrelated ordinary action between the Support trigger and its nested attack, although triggered effects still resolve properly. That can preserve an opportunity you would otherwise expose across multiple actions.
The deployed Luke turn
At seven resources, count the attacks you can make after deployment, not just the leader's 5/7 body. If the stronger side can heal the base after multiple friendly attacks, even modest attackers can contribute to stabilizing a race. A ship in the other arena may become part of your recovery plan without needing to attack a ground defender.
Suppose your base has four damage and you have two legal friendly attacks that can resolve after deployment. With Luke still in play and no intervening disruption, the two post-attack triggers can potentially remove that damage in two portions. You cannot heal beyond the damage present, and an opponent may remove an attacker or Luke between separate actions.
Do not deploy automatically after using all your attacks. Sometimes that is necessary for safety, but you may have passed up the stronger ability's value for the phase. Conversely, if an immediate attack must happen before the enemy removes your unit, delaying it for a deployment can also be wrong. The correct order depends on the response you expect.
Advantage, upgrades, and turning survival into pressure
Han Solo, Alphabet Squadron U-Wing, and Follow Me can supply Advantage. Each token adds one power and no HP, and disappears after its attached unit attacks or defends. It is not a permanent Experience token. A larger power number may improve a trade without helping the attacker survive the return hit.
R5-D4 offers an answer to a threatening upgraded unit. Before investing your own resources in a single tall attacker, remember that the opponent may have comparable answers. Luke's Jedi Lightsaber on Luke can help create a ground defensive role, but putting several cards onto one leader increases what you lose if that package is removed.
Hera Syndulla rewards successful base damage with healing, while Home One can repair a wider board. Their existence does not mean you should postpone every early trade until the perfect recovery turn. Use the healing your hand can actually reach before the opponent's clock expires.
Ground and space require separate plans
B-Wing Rearguard's defensive role depends on your ground presence. If your last ground unit is at risk, evaluate the linked consequence before assuming space remains secure. An opponent may attack the condition enabling a defense instead of the defender itself.
Green Leader is a different kind of space card: it is not necessarily the unit you should spend all your effort preserving. Sometimes a fragile attacker earns value through damage and its defeat ability. Healing decisions should follow a card's role, not a blanket rule that every damaged unit deserves to live.
Anakin Skywalker's Hidden and Saboteur combination provides another angle. Hidden restricts attacks during its relevant phase, not every possible removal effect; Saboteur can open attack targets by ignoring Sentinel. Read the exact card before assuming it is safe to stack upgrades or wait an extra round.
Mistakes that quietly waste the leader
The first is healing an attacker that was going to survive every relevant next hit anyway while ignoring a base race. The second is attacking into lethal combat damage because a heal is waiting afterward. The third is exhausting non-unit Luke for a small early benefit without considering whether another attacker later in the phase needs it more.
Against removal-heavy decks, prioritize repeated value from several bodies over a single spectacular repaired unit. Against fast decks, ask whether a trade prevents more damage than a base heal recovers. Against Palpatine's Advantage plan, remember that a boosted unit can force an unfavorable fight before your healing matters; attack order and upgrade answers remain necessary.
Useful upgrade experiments
The supplied list already has three copies of Han, Leia, Anakin, Battered Haulcraft, and Luke's Jedi Lightsaber. You cannot simply add fourth copies in ordinary constructed play. If your hands are awkward, examine the proportion of expensive cards and situational effects before shopping for another rare payoff.
Doctor Pershing begins at two copies. If the Support/healing/card-access interaction repeatedly carries your games, test a third while removing a card that has consistently been stranded. If opposing upgrades are the problem instead, consider testing the third R5-D4 rather than changing the whole deck's identity.
If you lose in space, a third useful supplied ship such as B-Wing Rearguard may be worth testing, but preserve the ground condition and early curve that make it useful. Write down the problem, make one small change, and compare several games. These are proposed experiments, not results from a claimed B3 tournament run.
B3's verdict
This Luke deck rewards careful aggression. You want attacks that leave something alive to repair, and enough pressure that healing translates into another useful action rather than merely a longer loss. I would recommend it to a player who likes visible combat puzzles and wants a deck whose defensive ability still encourages attacking. If you remember only one thing, remember that survival is checked before the reward arrives.
Official fixed 50-card main deck
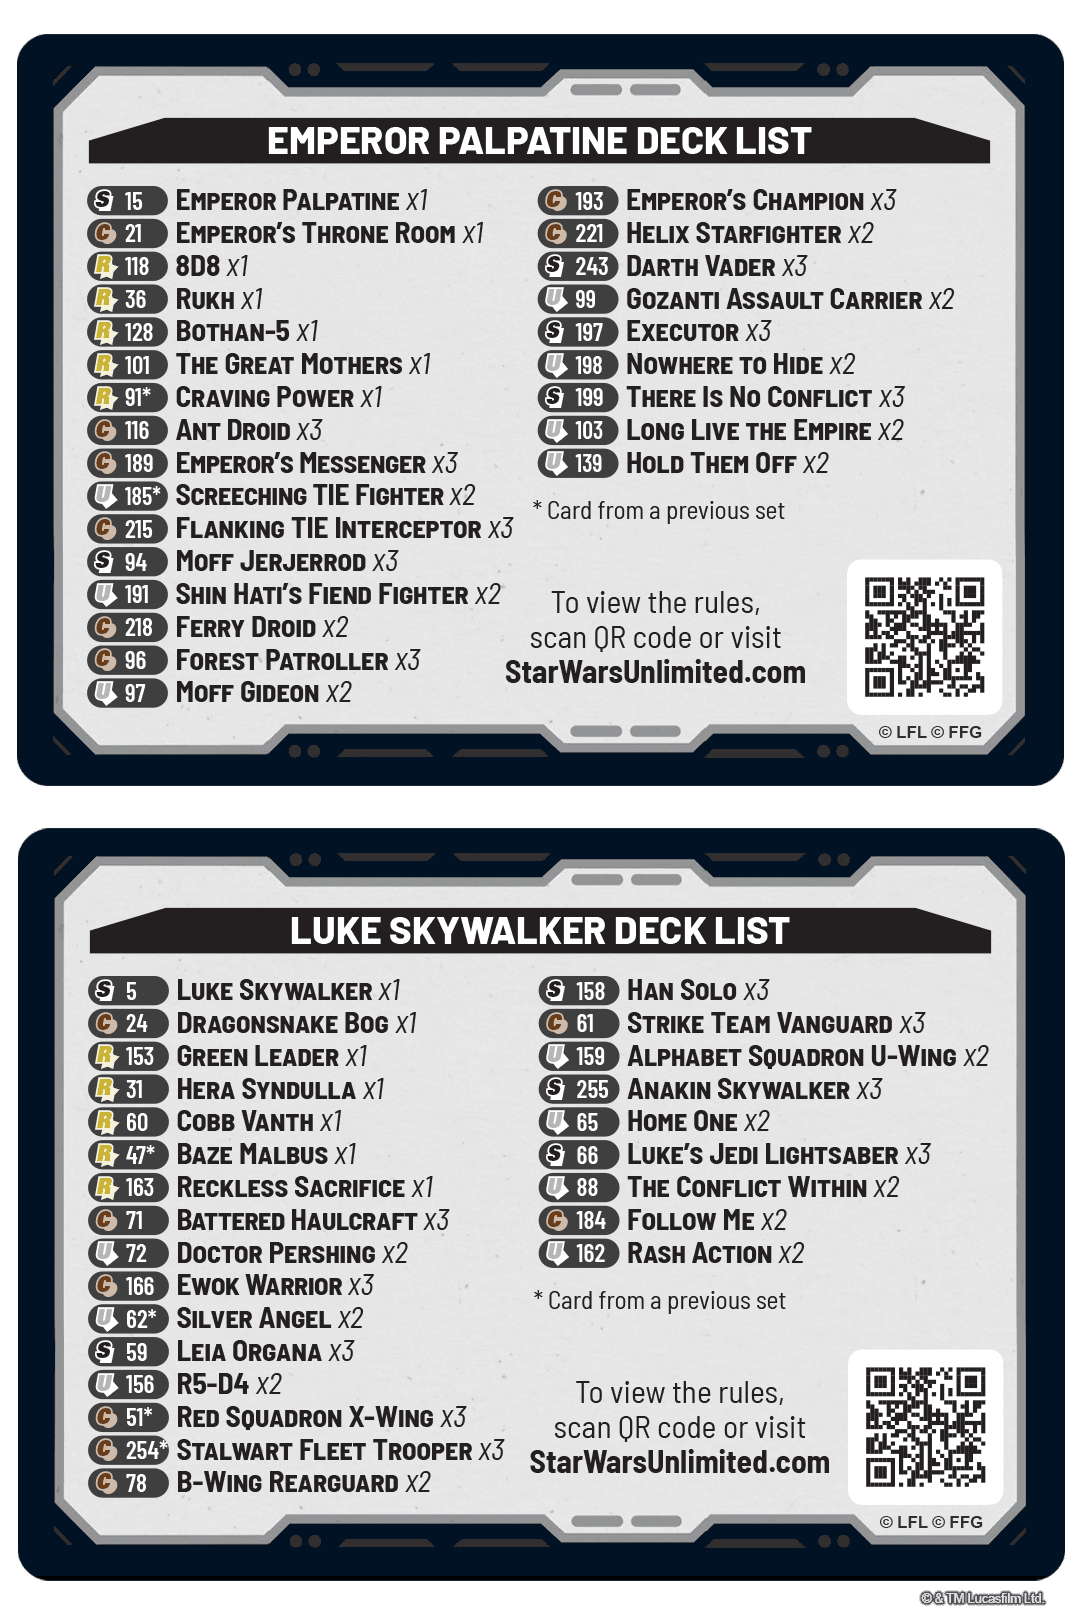
The leader and Dragonsnake Bog base sit outside these 50 main-deck cards. Counts below follow the official product list; earlier printings and same-name cards can have different abilities. Use the linked original for printed card numbers and previous-set markers.
- 1 each: Green Leader; Hera Syndulla; Cobb Vanth; Baze Malbus; Reckless Sacrifice.
- 2 each: Doctor Pershing; Silver Angel; R5-D4; B-Wing Rearguard; Alphabet Squadron U-Wing; Home One; The Conflict Within; Follow Me; Rash Action.
- 3 each: Battered Haulcraft; Ewok Warrior; Leia Organa; Red Squadron X-Wing; Stalwart Fleet Trooper; Han Solo; Strike Team Vanguard; Anakin Skywalker; Luke’s Jedi Lightsaber.
Inspect the official complete decklist image. The list includes both paired products; use the section headed Luke Skywalker.
Buying the deck and choosing upgrades
This is one player’s preconstructed deck, not a two-deck starter. An opponent needs their own playable deck. Check language, sealed condition, included accessories, and whether the listing is a single deck rather than a display or an individual leader card. Compare delivered prices; no live price or stock promise is made here.
As an Amazon Associate, B3 earns from qualifying purchases.
View the Ashes of the Empire Luke Skywalker Spotlight Deck on Amazon.
Learn the rules, then test the fixed deck
For a quick visual introduction, B3’s How to Play guide includes an 8:45 beginner tutorial. It explains the core action rhythm; use the worked examples here for this exact leader and fixed deck.
Keep the stock deck together for the first games. Record one resource choice, one action-order decision, and one card that felt stranded. Change a few slots only after identifying a repeated problem. For the next purchase, compare complete decks, singles, and boosters in the buying guide.
Event play: check the current format, reprint eligibility, errata, and suspended list before bringing the stock deck to an event. These products mix printings from different sets; an old printing may remain legal through an eligible reprint, but a recent package is not itself a legality certificate. Proposed upgrades here are small experiments, not a verified competitive list.
Card and inventory checks: October 20, 2026. Sources: official Spotlight Deck overview, official first look and leader images, current rules, errata, and suspended cards, and the original decklist linked above. Future rule or format changes take precedence.
Return to B3’s Star Wars: Unlimited hub.
Scope: the official Ashes of the Empire fixed Spotlight Deck, led by Luke Skywalker — I Can Save Him. This is rules-based analysis of the printed deck, with proposed practice and upgrade ideas; it does not claim B3 tournament results or hands-on testing.
Compare the paired deck: Ashes of the Empire Emperor Palpatine Spotlight Deck Guide: Advantage and Support. Browse all twelve Spotlight Deck guides and the SWU learning guides.
Considering packs for upgrades? Read the Ashes of the Empire booster buying guide before choosing a sealed product. For premium treatments, see Carbonite packs explained.